Development of the new Sky Shed PodMax – a much larger version of the SkyPOD observatory. Imagine the size of the telescope you could fit in there!!!

New Skypod MAX – 12′ in diameter
Development of the new Sky Shed PodMax – a much larger version of the SkyPOD observatory. Imagine the size of the telescope you could fit in there!!!
New Skypod MAX – 12′ in diameter
The China Railway Museum (Zhengyangmen) is located downtown, just south east of Tienanmen square. (sometime this museum is referred to as the “Beijing Railway Museum”) Their website for this museum (and the other two at Dongjiao and Badaling) is http://www.china-rail.org/

The old Peking train station, now the China Railway Museum (Zhengyangmen)
Unlike the museum at Dongjiao, this museum does not have any static displays of trains. Mainly, the museum displays are of historic news clippings and railway artifacts. Also unlike any other museum in China, the museum not crowded in the least bit.

Looking out the museum’s 3rd floor window at Zhengyangmen. Tienanmen square is just to the right of the picture.
A ticket booth for the museum is just right outside the entrance, close to the KFC. Here’s the ticket for the museum, 20 yuan, or about $3.30 CDN.

Beijing Railway Museum ticket
Right after you entered the main entrance, you are greeted to this large wooden wall sculpture.

Wooden wall sculpture at the museum entrance.
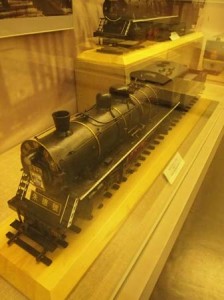
A replica of the 0-3-0 Dragon Locomotive sits just after the entrance. Built in 1881, it ran on the Tangshan to Xugezhuang rail line, with a top speed of 32km/h.

0-3-0 Dragon Locomotive
The first gallery has newspaper clippings, pictures and artifacts from some of the first railways built in China.

First gallery
Below is a statue of Zhan Tianyou (1861-1919) from Guangdong province, the father of Chinese Railways, built the first Chinese line from Beijing to Zhangjiakou.

Zhan Tianyou – father of Chinese Railways
Next is an interesting display of a steam locomotive cylinder and working valves.

Model of steam locomotive cylinder and valve gear
This interesting machine was built in Germany, first used on a Chinese railway for the printing of tickets in 1927 and was in continuous use until the end of the 1980s.

Ticket Printing Machine 1927

Royal Coach from the Qing Dynasty

Locomotive badge from steam locomotive Mao Zedong
1:16 scale model of the steam locomotive Zhu De
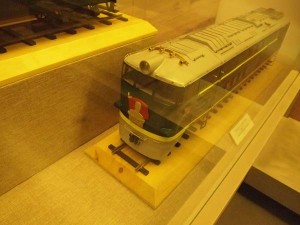
1:16 model of electric locomotive named after China’s first prime minister Zhou Enlai

Replica to Chinghuayuan Station , built in 1910. (but actually leads to the washrooms)

China Rail emblem
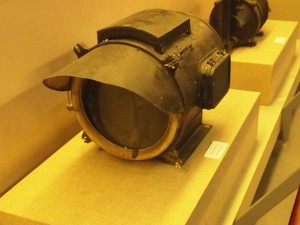
Headlamp from a steam locomotive
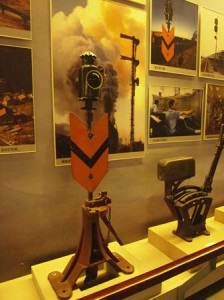
Switch stands for turning the direction of track rails.
Up stairs on the 2nd floor, are displays for China’s modern railway. There are various full size mock-ups, pieces of experimental prototypes and scale models.
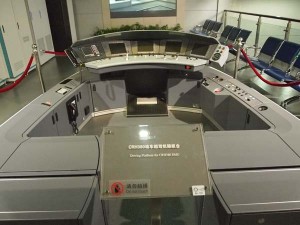
Driving cab for the CRH380 high speed train.
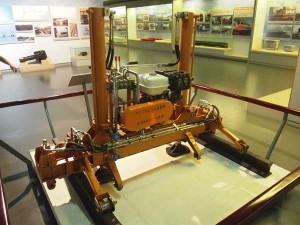
Rail lifting machines used during the construction of the high speed lines

Prototype of a coupler used to join train cars together.
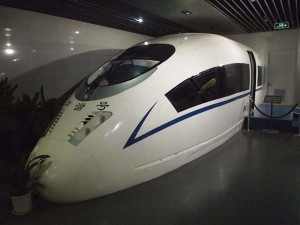
Full size simulator (extra cost $) for the high speed driver’s EMU.
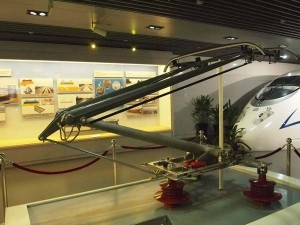
Pantograph used to conduct electricity from overhead wires to the train.

Full size boggy of a high speed passenger rail car

Brake caliper for the high speed CHR3 trains

3rd floor gift shop and lcd flat panel displays
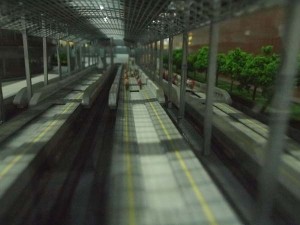
In the basement of the museum are the sand table displays. These are large boxes with the terrain sculpted in sand. A series of projectors project colour onto the terrain, as well areal images of the cities, and the high speed trains travelling between the cities. Pretty neat, makes quite the dynamic display.
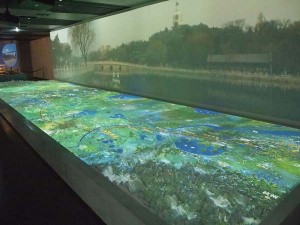
Sand table overview photo, of a high speed heading into Beijing. Baihai park is pictured on the wall.
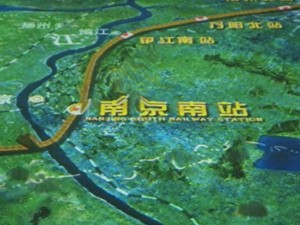
Photo on sand table of a train travelling over the terrain south of Nanjing , crossing the Yangzi river
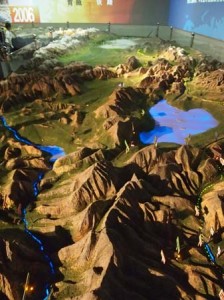
Some of the mountainous terrain displayed on the sand table.

Scale model of the new Chongqing high speed railway station.
Close up of the interior of the model of Chongqing railway station.

Model of the Nanjing Dashengguan bridge over the Yangzi River.

Head on view of the Nanjing Dashengguan bridge model.
On the main floor by the exit is a small Bachmann model train store, selling most of the products that are currently being made by Bachmann model trains.

Bachmann model train store near the exit to the museum.

HO models in the Bachmann store. The CN gp-38 model is only 285 yuan – about $50 CDN
I find train museums when I travel to foreign countries fascinating. Trains represent one of the world’s first global products. Yet in a lot of ways, the trains are very different. So when I was in Beijing this past June, 2012, I made a point of seeing this museum.
China Railway Museum (Dongjiao) is located in the sub-burbs of Beijing, just outside of the 5th ring road. This is not to be confused with the China Railway Museum (Zhengyangmen) that is located downtown near Tienanmen square. (sometime these are referred to as “Beijing Railway Museum”) Their website for this museum (and the other two at Zhengyangmen and Badaling) is http://www.china-rail.org/
")
China Railway Museum (Dongjiao)
Getting to the museum is a bit of a challenge. We took a taxi from Wangjing subway station on line 15. Almost none of the taxi drivers have heard of this museum, although the nearby China National Film Museum is better known. So it may help to bring a map with you. Google map of the museum is quite accurate, and here is a map from the back of my museum ticket stub:

Map to the China Railway Museum (Dongjiao) in Beijing
The front of the ticket is pretty cool looking:

Ticket for the China Railway Museum (Dongjiao) in Beijing
The museum is a large hanger of a building, 16,500 sq. meters, consisting of 100 items on static display of old rolling stock and locomotives from China’s past. Unfortunately, the signage is minimal. Some is in English, but most in Chinese. There is an audio program, but only in Mandarin. Staff at the museum was minimal, only a ticket taker and some cleaners. When we were there, the museum was mostly empty, with the only other paying customers, a grandfather and his grandchild.
To the right after entering the museum, is the steam locomotives, and on the left are electric & Diesel locomotives and coaches.

China Railway Museum steam engine collection

China Railway Museum Diesel and electric locomotives
Here are a few of the prototypes they have on display.
Steam Engines:

Class:MG-35 type:2-6-0 length:17.08m max speed:75km/h tractive effort:12,100kg origin:UK

tender MG-35

#601 Class: Shengli SL Style: 4-6-2 Length 22.62m Max Speed: 110km/h Tractive effort: 16,880kg Origin: China 1956

#601 builder’s plate Sifang Locomotive Works

#1001 Class: Renmin RM Style: 2-6-4 Length: 23.25 Max Speed: 119km/h Tractive effort: 18,050kg Origin: China 1958
 Style: 2-8-2 Length: 21.17m Max Speed: 80km/h Tractive effort: 20,050kg Origin: Japan 1933")
#3022 Class: Jiefang 6 (JF6) Style: 2-8-2 Length: 21.17m Max Speed: 80km/h Tractive effort: 20,050kg Origin: Japan 1933

#4101 Class: Jiefang Style: 2-8-2 Length: 22.63 Max Speed: 80km/h Tractive effort: 24,030kg Origin: China 1958

#4101 builder’s plate

#890 Class: SL12 Style: 4-6-2 Length:22.05m Max speed: 90km/h Tractive effort: 16,500kg Origin: Japan 1942
 Style: 2-8-2 Length:21.91m Max Speed: 80km/h Tractive effort: 24,030kg Origin: China 1952")
#2121 Class: Jiefang (JF) Style: 2-8-2 Length:21.91m Max Speed: 80km/h Tractive effort: 24,030kg Origin: China 1952

#2121 builder’s plate Jiefang
 Style: 2-8-2 Length: 22.12m Max Speed: 85km/h Tractive effort: 21,400kg Origin: Japan 1940")
#3673 Class: Jiefang 9 (JF9) Style: 2-8-2 Length: 22.12m Max Speed: 85km/h Tractive effort: 21,400kg Origin: Japan 1940

#3673 catching an oil leak

#3673 cab with patriotic slogan “learn from Mao Zedong hao, a model train”

#3673 red star on cylinder cover plate

#304 Mao Zedong Class: Jiefang 1 Style: 2-8-2 Length: 23.75m Max Speed: 80km/h Tractive effort: 24,030kg Origin: Japan 1941

#304 Mao Zedong cab – this locomotive was re-named in October 1946 by the Northeast Bureau of the CPC. It was in service till 1977.

#304 Mao Zedong front

#51 Class: PL3 Style: 2-6-2T Length 10.77m Max Speed: 60km/h Tractive effort: 16,800kg Origin: Japan 1935
")
#1191 Class: Jeifang 1 (JF1) Style: 2-8-2 Length: 21.91m Max speed: 80km/h Tractive effort: 24,030kg Origin: Japan 1942
 front")
#1191 Class Jeifang 1 (JF1) front view, was renamed Shu De (a famous Chinese general) in October 1946 and remained in service till 1977.
")
#2101 Class: Jeifang 1 (JF1) Style: 2-8-2 Length: 21.91m Max speed: 70km/h Tractive effort 24,030kg Origin: China 1950
 front")
#2101 Class: Jeifang 1 (JF1) front view, built by Sifang works, this locomotive was named “National Day” in September 1950 to mark the first anniversary of the PRC.
 builder's plate")
#2101 Class: Jeifang 1 (JF1) builder’s plate
 air cylinder")
#2101 Class: Jeifang 1 (JF1) air cylinder
 Style: 0-6-0T")
#1019 Class: Gongjian (GJ) Style: 0-6-0T Length: 9.74m Max speed: 35km/h Tractive effort: 14,735kg Origin: China 1959 Taiyuan Locomotive Works

#1019 builder’s plate
")
#101 Class: Qianjin (QJ) Style: 2-10-2 Length: 26.02m Max speed: 80km/h Tractive effort: 33,290kg Origin: China 1964 Datong Locomotive and Rolling Stock Works

#101 builder’s plate
")
#5001 Class: Jianshe (JS) Style: 2-8-2 Length: 23.39 Max Speed: 85km/h Tractive effort 25,476kg Origin: China 1957 Datong Locomotive and Rolling Stock Works

#5001 builder’s plate
")
#1979 Class: Friendship (FD) Style: 2-10-2 Length: 29.07m Max speed 85km/h Tractive effort: 34,010kg Origin: Soviet Union 1931
")
#0001 Class: Qianjin (QJ) Style: 2-8-2 Length: 26.1m Max speed 80km/h Tractive effort 33,290kg Origin: China 1956 Dalian Locomotive & Rolling Stock Works
")
#0004 Class: Qianjin (QJ) Style: 2-8-2 Length: 29.29m Max speed 80km/h Tractive effort 33,290kg Origin: China 1958 Dalian Locomotive & Rolling Stock Works

#0006 Class: KF1 Style 4-8-4 Length: 28.41 Max Speed: 100km/h Tractive effort: 19,300kg Origin: UK 1936 Vulcan Foundary England

#146 Class: PL9 Style: 2-6-2 Length: 19.42m Max Speed 80km/h Tractive effort: 14,900kg Origin: Belgium 1922

#146 tender rear view
")
#3773 Class: Jeifang 11 (JF11) Style: 2-8-2 Length: 20.70m Max Speed: 80km/h Tractive effort: 18,160 Origin: USA 1937

#3787 Class: JF11 Style: 2-8-2 Length: 20.7m Max Speed: 80km/h Tractive effort: 18,160kg Origin: USA 1937

#534 Class: KD7 Style: 2-8-0 Length: 20.37m Max speed: 90km/h Tractive effort: 32,200kg Origin: USA 1947

#534 Class: KD7 mail catcher

#534 builder’s plate

#373 Class: KD5 Style: 2-8-0 Length: 16.56m Max speed: 50km/h Tractive effort: 16,370kg Origin: Japan 1921

#152 Class: SL3 Length: 21.5m Max speed: 100km/h Tractive effort: 15,670kg Origin: Japan 1939

#152 Class: SL3 cab

#0 Class: zero Style: 0-4-0T Length: 4.75m Max speed: 20km/h Origin: UK 1881
Narrow Gauge Locomotives:

#23 Class: SN Style: 0-10-0 Length: 14.85m Max speed: 45km/h Tractive effort: 6,691kg Origin: USA 1929 built for service in Yunnan Prov. for 0.6m narrow gauge line.

#23 Class: SN view from conductor’s side
")
#738 Class: Jiefang 51 (JF51) Style: 2-8-2 Length: 11.55m Max speed: 55km/h Tractive effort: 11,571kg Origin: France 1926 built for the Yunnan-Vietnam 1.0m gauge

#738 tender lamp

#579 Class: KD55 Style: 2-8-0 Length: 16.56m Max speed: 50km/h Tractive effort: 16,370 Origin: Japan 1921 for Yunnan-Vietnam line, 1.0m gauge

#759 Class: ST Style: 2-6-4 Length: 19m Origin: UK 1948
Diesel Locomotives:

#0001 Class: DF7J Style: Co-Co Length: 18.98m Max speed: 100km/h Tractive effort 47,859kg Origin: China 2003

#0001 Class DF8 Style: Co-Co Max speed: 100km/h Power: 3310 kW Origin: China 1997

#0001 Class: DF8 little fan vents

#3001 Class DF7d Power:1,840kW Tractive effort: 428kN Weight: 428t Origin: China 1995

#3001 Class DF7d front with Tiananmen

#3001 Class: DF7d builder’s plate

#3001 Class DF7d truck steering

#0001 Class DF7d green

#0001 Class DF7d green vents
")
#0007 Class Dongfeng 5 (DF5) Style: Co-Co Length: 18.8m Max speed: 80km/h Tractive effort: 39,240kg Origin: China 1977 Dalian Locomotive & Rolling Stock Works and Tangshan Locomotive & Rolling Stock Works
 long hood")
#0007 Class Dongfeng 5 (DF5) long hood
 builder's plate")
#0007 Class Dongfeng 5 (DF5) builder’s plate

#4001 Class Dongfang DF4d Style: Co-Co Max speed: 100km/h Power: 2,940kW Weight: 138t Origin: China 1985

#4001 Class Dongfang DF4d builder’s plate

#4001 Class Dongfang DF4d wheel sander

#0001 Class Dongfang DF4dj AC drive Style: Co-Co Max speed: 100km/h Power: 2,940kW Weight: 138t Origin: China 2000

#0001 Class Dongfang DF4dj AC drive builder’s plate

#0001 Class: DF4 Style: Co-Co Length: 21.1m Max speed: 100km/h Tractive effort: 42,100kg Origin: China 1973 Dalian Locomotive & Rolling Stock Works

#0001 Class: DF4 control cab

#4290 Class: DFH1 Style: Bo-Bo Length: 17.3m Max speed: 120km/h Tractive effort: 25,538kg Origin: china 1971 Diesel-Hydraulic locomotive.

#4290 Class: DFH1 builder’s plate

#0008 Class: DFH2 Style: Bo-Bo Length: 13.08 Max speed: 62km/h Tractive effort: 19,400kg Origin: China 1974

#0008 Class: DFH2 builder’s plate

#0009 Class: DFH3 Style: Bo-Bo Length: 18.55m Max speed: 120km/h Tractive effort: 27,653kg Origin: China 1976 Diesel-hydraulic locomotive.

#0009 Class: DFH3 builder’s plate

#0001 Class: DFH5 Style: Bo-Bo Length: 14.9m Max speed: 80km/h Tractive effort: 27,800kg Origin: China 1976 Diesel-hydraulic locomotive

#3003 Class: BJ Style: Bo-Bo Length: 16.33m Max speed: 120km/h Tractive effort: 22,700kg Origin: China 1970

#3003 Class: BJ builder’s plate

#0009 Class: NY6 Style: Co-Co Max speed: 108km/h Power: 3160kV Origin: Germany 1972 these locomotive were used to hall VIP’s such as the premiere.

#0009 Class: NY6 builder’s plate

#0009 Class: NY6 Style: Co-Co Length: 23.46m Max speed: 108km/h Tractive effort: 46,429kg Origin: Germany 1972 built by Henschel
Electric Locomotives:
")
#1008 Class: Shaoshan 1 (SS1) Style: Co-Co Length: 20.64 Max speed: 90km/h Tractive effort: 48,700kg Origin: China 1968 Zhouzhou Electric Locomotive Works and Xiangian Electric Locomotive Works.
 cab")
#1008 Class: Shaoshan 1 (SS1) cab
 builder's plate")
#1008 Class: Shaoshan 1 (SS1) builder’s plate

#0001 Class: SS5 Style: Bo-Bo Max speed: 140km/h Power: 3,200 kW Origin: China 1990
Passenger Coaches:

Heavyweight coach #90415

#001 Class: BTS Coach – wood framed narrow gauge, 40 seats

#97347 Class: Gongwuche GW business car

#50359 Class: Ruanwoche RW Length: 26.6m Weight: 75.1t Sleeper Car – 10 berths

#97334 Class: SY coach

#97334 Class: SY coach interior stained glass

#97334 Class: SY coach interior private room

#97336 Class GW Length: 24.54m Origin: China 1936 built by Daren Works of the Manchuria Railways, later used as Zhou Enlai’s official coach.
Rolling Stock:

Bay window caboose #9000908

Tanker car #8045514

Hopper car with cabin #5502704

Hopper car with cabin #5502704 end view

Heavyweight coach #90415 electrical generator

Scale test car #8066501

#5621572 Class: D17 Schnabel car
One of the most important aspects of keeping a telescope operating in peak condition is to make sure that the mirrors are properly collimated. One of the easiest methods of aligning your telescope mirrors is to use a laser collimator. These can be quite easily made using a regular laser pointer purchased at any dollar store. If you have a lathe, you can turn one easily out of aluminum or wood, as seen here: http://vincechanblog.ca/laser/laser.html
An alternative method is to use a rapid prototyping machine. In this case, I needed a new collimator for a “pen” style laser pointer. In this design, the build was in two stages, the bottom half (4 hour build):

Bottom build on Makerbot Cupcake
An the top half (10 hour build time):

Top portion which holds the laser pen
Here are the final parts, before being glued together. I did lightly sand the bottom build to ensure it would fit into the telescope draw tube. The bottom build was designed to be 10 thou’ oversize.

Two halves before gluing
Here is the final finished laser collimator, painted black. The laser is held with two sets of 3 set screws (#8-23). A 1/4″ screw press on the on/off button on the laser pointer.

Finished collimator
Seems like not a lot of people have Dobsonian telescopes in their POD observatory. Given the 4′ high walls, the POD does limit what you can see from a Dob on the horizon. However, as I live in Toronto, my horizon is fairly blocked off by trees and houses anyways.
To get the most out of my limited views, my Dob is mounted on a dolly. Basically, its just a piece of 3/4″ plywood with some 3″ castor wheels screwed to the bottom:

Dob dolly on a rope

Dob dolly side view
OK, I’ve always been a visual observer, and have resisted jumping on the GOTO telescope bandwagon. Part of the fun of astronomy was always using charts and star hopping to find a new deep sky object. How else would one learn the night sky?
However, I must admit, having the power of a star atlas in something as small as your iPod is a real luxury. And having that connected to your telescope makes things real easy, maybe too easy, but that will be a debate for another day…..

DSC on iPod using skywire
Here are the major components of the project:
Sky Safari plus or pro – this is an astronomy program that runs on your iPod or similar device. It’s a pretty full fledged astronomy software package, considering what used to cost $100′s on a PC. To use this as an interface, you need to use cable that hooks up to your iPod, sold by Sky Safari as the “sky wire”. Basically, this sends out a RS232 serial signal to your telescope or device. You need to set Sky Safari in the “Settings” menu, telescope setup to Scope Type: Basic Encoder System, and under Mount Type: Alt-Azimuth Fork. Also, in that menu, set the “Encoder Steps Per Revolution” to +4096 for both axis, and set “Get Automatically” to OFF.
Quadrature Encoders – the versions that I use are capacitive types, they are much cheaper than optical encoders. The encoders are CUI-AMT102-V kit, order from Digikey: 102-1307-ND Luckily, the pin outs on the encoders are 0.1″ pitch, so any 5-pin straight plug would fit. On my Dobsonian telescope, the azimuth encoder was mounted to the center bolt of my rocker.

Azimuth encoder in Dob rocker box

Azimuth encoder close up of mounting
The altitude encoder is mounted at the center of rotation of the Dob’s rocker arms. The required the fabrication of a tangent plate to hold the encoder stationary, relative to the rocker box. I just happen to make mine out of “plexi” glass, as shown below:

Altitude encoder mounting
To interface between the encoders and the iPod-skywire cable, I used an Arduino micro-controller. Initially, I tried to read the encoder pulses without interrupts, but that resulted in loosing steps if I moved the telescope too fast. A relative new encoder library for Arduino/Teensy was posted by PJRC, and can be downloaded here: http://www.pjrc.com/teensy/td_libs_Encoder.html You’ll need to install the ‘encoder’ directory to your Arduino library on your computer. If you are new to Arduino, they can be purchased from many suppliers: http://www.makercanada.ca/ You can download the IDE fro Arduino for free here: http://arduino.cc/
As the skywire cable requires a RS232 serial signal, you need to shift the signal using a MAX232 chip. They can be purchased relatively cheaply either from shops listed in http://www.makercanada.ca/ or from Digikey #296-6940-5-ND. I power the MAX323 with 5V pin from the Arduino. The Arduino is powered with a 9V battery. Here’s a picture of the prototype circuit:

DSC circuit in lozenges box
Eventually, I’ll find a better mounting box… ha ha. Here’s the schematic of the circuit:

encoder schematic
Here is the source code for Arduino:
sky_safari_encoder_interrupt – note: you’ll need to change the extension to .pde or .ino
Working on making an Arduino digital setting circle interface to Sky Safari on my iPod. Had it working last year, but was loosing steps if I move , the telescope too fast. Re-wrote the code to use the two interrupts on the Arduino, waiting for a clear night to test it out.
Hi,
I’ve added a few pages on “deglitching’ radio control signals to my battery powered trains. These are on my trains page: http://vincechanblog.ca/trains.html
I’ve added a new webpage detailing my installation of a Fishman Infinity Matrix Undersaddle transducer to my acoustic guitar. Please see it here:
http://vincechanblog.ca/fishman/fishman.html
Vincent
I seem to get the same questions via e-mail about the various DIY projects on my website. I’ve set up this blog page so that you can post your questions (and hopefully, I can answer) for all to see.
bye,
Vincent
